
Mastering the Art of Polymer Clay Dolls
- Noemi Smith
- Nov 10, 2025
- 4 min read
Creating polymer clay dolls is a magical journey. It’s where imagination meets skill, and a simple lump of clay transforms into a charming, lifelike figure. Whether you’re drawn to fantasy creatures or delicate art dolls, mastering this craft opens up endless possibilities. I’ve spent years exploring this art form, and I’m excited to share what I’ve learned with you. Let’s dive into the world of polymer clay doll crafting and unlock your creative potential.
Getting Started with Polymer Clay Doll Crafting
Before you start sculpting, it’s important to gather the right materials and tools. Polymer clay comes in many brands and colors, but I recommend starting with a high-quality, soft clay that’s easy to condition and shape. You’ll also need:
Basic sculpting tools: A set of small blades, needles, and shaping tools.
A clean workspace: Keep your area tidy to avoid dust or lint sticking to your clay.
An oven: Polymer clay cures in a home oven at low temperatures.
Armature wire: For building the skeleton of your doll, especially if it’s larger or has movable parts.
Once you have your supplies, spend some time conditioning the clay. This means kneading it until it’s soft and pliable. It’s a simple step but crucial for smooth sculpting.
Tips for Conditioning Clay
Warm the clay in your hands or use a pasta machine for even conditioning.
Avoid over-conditioning, which can make the clay too soft and sticky.
Store unused clay wrapped tightly in plastic to keep it fresh.
Essential Techniques for Polymer Clay Doll Crafting
The beauty of polymer clay doll crafting lies in the variety of techniques you can use to bring your doll to life. Here are some foundational methods I rely on:
Sculpting the Head and Face
Start with a simple ball of clay for the head. Use your fingers and tools to shape the jawline, cheeks, and forehead. For facial features:
Eyes: Create small indentations for eye sockets. You can add tiny balls of clay for eyeballs or paint them after baking.
Nose: Pinch a small triangle of clay and blend it into the face.
Mouth: Use a needle tool to carve a gentle smile or expression.
Remember, subtlety is key. Small details make a big difference.
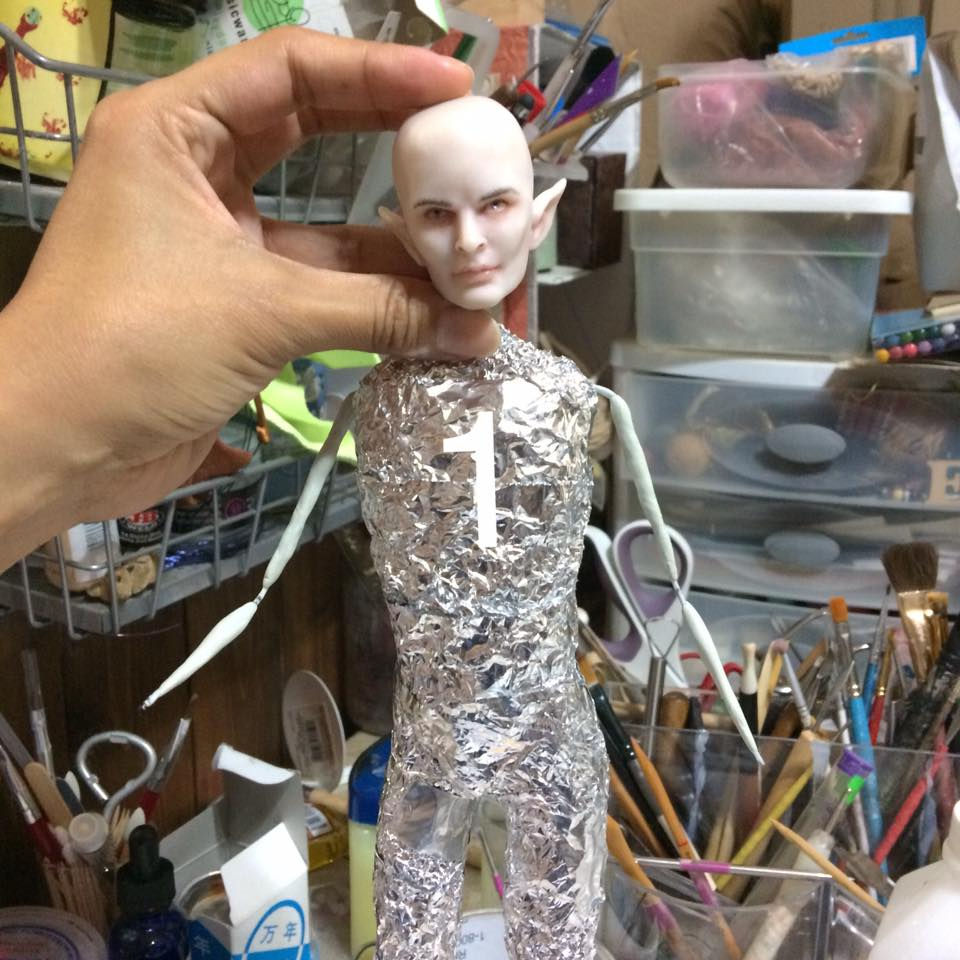
Building the Body
For the body, I often use armature wire to create a sturdy frame. Wrap the wire with foil to bulk up the shape without using too much clay. Then, cover it with clay and smooth it out.
Keep proportions in mind: heads are usually larger in art dolls for a whimsical effect.
Add joints if you want your doll to be poseable.
Adding Texture and Details
Texture brings personality. Use tools like toothbrushes, sponges, or even fabric to imprint patterns on the clay. For hair, roll thin strands of clay and attach them carefully.
Baking Your Doll
Follow the clay manufacturer’s instructions for baking times and temperatures. Usually, it’s around 265°F (130°C) for 15-30 minutes depending on thickness. Use an oven thermometer to ensure accuracy.
Bake on a ceramic tile or glass sheet for even heat.
Avoid overbaking to prevent discoloration or brittleness.

Painting and Finishing Touches
Once your doll is baked and cooled, it’s time to add color and personality. I use acrylic paints for their vibrant colors and ease of use.
Painting Tips
Thin your paint with water for smooth layers.
Use fine brushes for delicate features like eyelashes or freckles.
Seal your paint with a matte or gloss varnish to protect it.
Adding Accessories
Clothing and accessories can elevate your doll’s charm. You can sculpt tiny shoes, hats, or jewelry from clay or use fabric and beads. Experiment with different materials to find what suits your doll’s style.
Exploring Advanced Polymer Clay Doll Crafting
As you grow more confident, you might want to try advanced techniques like mold making and reproductions. These allow you to create multiple copies of your favorite dolls or parts.
Mold making: Use silicone molds to replicate heads, hands, or other components.
Reproduction: Cast your molds with liquid polymer clay or resin.
This is a fantastic way to expand your creative business or share your art with others.
If you want to dive deeper into these skills, I highly recommend checking out polymer clay doll making. It’s a great resource for tutorials, supplies, and inspiration.
Bringing Your Dolls to Life with Personality
What truly makes a polymer clay doll special is the story it tells. I always encourage adding little quirks or expressions that reflect a character’s personality. Maybe your doll has a mischievous grin or dreamy eyes. These details connect your art to the viewer.
Personalizing Your Dolls
Use color choices that reflect mood or theme.
Add tiny props like books, flowers, or magical items.
Experiment with poses that suggest movement or emotion.
This personal touch is what turns a simple sculpture into a beloved art piece.
Your Next Steps in Polymer Clay Doll Crafting
Now that you have a solid foundation, it’s time to create your own masterpieces. Start small, practice regularly, and don’t be afraid to make mistakes. Each doll you craft will teach you something new.
Remember, polymer clay doll crafting is not just about the end product but the joy of creation. Share your work with fellow artists, join online communities, and keep exploring new techniques.
If you’re looking for unique, handcrafted art dolls or want to learn more about sculpting, mold making, and reproduction, Angels by Noemi is a wonderful place to start. Their passion for this craft shines through every piece and lesson.
Happy sculpting!


Comments